Gels and Gelling

This isn't just your mother's Jell-o. Modernist gelling ranges from tender panna cotta and custards to fluffy marshmallows and gel cubes.
Gelling is a wide ranging and very important technique in traditional and modern cooking. It encapsulates everything from the old to the new, from custards to edible gel sheets to spherification. There are many different ingredients that cause gelling including eggs, starches like flour, and hydrocolloids like agar and carrageenan.
Table of Contents

What Is Gelling?Top
Gelling is a very interesting process. There are a few different ways gelling happens but most of them result in some kind of solid structure that traps liquid in it. The structure is often made of proteins and gives form and body to the gel.
To achieve this structure we have to add gelling agents to the liquid we want to gel. There are many traditional gelling ingredients most cooks are familiar with. Gelatin is often used in desserts as well as naturally providing body in stocks. Cooked eggs become gels. Even the proteins in flour form a network for doughs.
Now, there are a variety of new gelling agents, many of which are called hydrocolloids, that give us a lot more control over the types of gels we create.

How Does the Gelling Process Work?Top
Even though there are many different kinds of gels, most often a similar process is used to create them. Go to the Ingredient page for instructions on a specific ingredient.
Dispersion
Typically, the first step is to disperse the gelling agent in the liquid you want to gel. Dispersion is simply the act of evenly distributing the ingredient throughout the liquid. This will ensure a gel of even strength.
A good example of dispersion gone wrong is when you try to add flour to a hot liquid. Instead of a smooth gravy you end up with lumps where the flour gelled together. Proper dispersion of the flour, usually using a water slurry or fat-based roux, eliminates the formation of lumps.
Depending on the ingredient you may have to use a hot, cold, acidic, or other liquid for proper dispersion. For some ingredients a whisk or spoon will work fine, others will need the stronger shearing forces of an immersion or standing blender.
One exception to the rule of dispersing first is gelatin. It is hydrated, or "bloomed" first, before being dispersed.

Hydration
Once the gelling agent has been fully dispersed it needs to hydrate. Hydration is basically the process of absorbing water, or another liquid, and swelling. This absorption of liquid, in conjunction with other processes, causes the thickening of the mixture, creating a molecular mesh that traps water. This is a simplification of the molecular processes; if you are interested in the science behind them, a lot of good information can be found on the internet.
Depending on the gelling agent and the liquid being used, hydration will occur at different temperatures and over different time frames. Many ingredients will need to be heated for hydration to occur, like flour and agar.
Gelling or Setting
The final stage is when the liquid actually gels. Many gelling agents will gel at a specific temperature; others may gel at any temperature. This process can take anywhere from a few minutes to many hours.
Other Gel Considerations
Gelling Raw Ingredients
Sometimes you do not want to bring the liquid you are gelling to a boil. In order to hydrate a gelling agent that must be heated you have two options.
You can disperse and hydrate the gelling agent in a small amount of the liquid and blend the rest of the liquid into it after hydration. You can also disperse and hydrate the gelling agent in water and blend the liquid into that. Either way, the temperature will drop quickly and some gelling agents, such as agar, will begin to set faster than usual.
Warming up the liquid as much as you can is advised for better dispersion once the gelling agent has hydrated.
Water Impurities
Due to the way many of these ingredients create their molecular webs the chemicals in your water can affect the gelling power of your dishes. If you have water that has a high mineral content, or are consistently having trouble with your gels it might be worth experimenting with filtered, spring, or distilled water. It won't always fix the problem but it will at least eliminate one variable from the equation.
Hot vs Cold
Different gelling agents create gels that can withstand a wide variety of temperatures. Be sure to pick a gelling ingredient that meets the needs of the dish you are preparing. For instance, gelatin melts just above room temperature so it cannot be used with hot preparations while agar gels can be heated up to around 80°C (176°F) before it melts.

What Ingredients Are Commonly Used in Gelling?Top
There are many different gelling ingredients. Below is a short description of several of the gelling agents we cover in depth.
Agar
Agar creates brittle gels and it must be brought to a boil to hydrate. It sets at room temperature and can be heated to 80°C (176°F) before melting. You can also add locust bean gum to agar gels to make them more elastic.
Agar is typically used in a ratio of 0.2% to 3.0%. For soft gels a 0.2% to 0.5% range is ideal and the gel becomes harder as more agar is added. Locust bean gum can be added to make the gel more elastic, usually by replacing 10% of the agar with locust bean gum.
For more information you can view my Guide to Agar.
Carrageenan: Iota
Iota carrageenan creates elastic gels and is especially effective with dairy products. It is often used in custards or puddings. It must be heated to hydrate then cooled to set the gel. Once gelled it can be reheated several degrees above the gelling temperature before melting.
Iota Carrageenan is normally mixed in a ratio range of 0.02-0.04% to just thicken a dairy based product or a 0.4-1.5% ratio to prepare a dairy gel. Non-dairy gels often require a little more iota in the range of 0.75-1.5%. Since foams are more delicate, a 0.2-1.0% ratio of iota carrageenan is needed to make foams from fluid gels. For dairy fluid gels when blended it takes a ratio range of 0.1-1.0% iota carrageenan.
For an end result with a specific elasticity, mix the iota carrageenan and kappa carrageenan together; the total amount of the carrageenans used for gels is a 0.3-1.5% ratio. For a medium elasticity use 1 part iota to 1 part kappa ratio; for an elastic gel a 2 iota to 1 kappa ratio; and for a brittle gel a 1 iota to 2 kappa
For more information check out my Guide to Iota Carrageenan.
Carrageenan: Kappa
Kappa carrageenan can be used to create firm, brittle gels and is especially effective at gelling dairy-based liquids. To gel, the liquid must contain either calcium or potassium that is free to bind with the kappa carrageenan.
For dairy gels kappa carrageenan is normally mixed in a ratio of 0.3-1.5% range. For dairy fluid gels when blended it often takes a little less, a ratio range of 0.3-1.0% is appropriate.
For an end result with a specific elasticity, mix the iota carrageenan and kappa carrageenan together; the total amount of carrageenan used for gels is a 0.3-1.5% ratio. For a medium elasticity use 1 part iota to 1 part kappa ratio; for an elastic gel a 2 iota to 1 kappa ratio; and for a brittle gel a 1 iota to 2 kappa
It must be heated to hydrate then cooled to set the gel. Once gelled it can be reheated several degrees above the gelling temperature before melting.
Discover more information by visiting my Guide to Kappa Carrageenan.
Gelatin
Gelatin forms elastic gels that can't be raised much above room temperature. Gelatin has to be dispersed in hot liquid and sets at room temperature or below.
The powdered gelatin referred to in this section has a bloom strength of 225. For this gelatin the ratios often range from 0.5% to 1.0% for soft, tender gels. For very hard, firm gels it can be used in ratios of upwards of 6% but the typical range for medium firm gels is 1% to 3%. For light foams you commonly see a 0.4% to 1.0% ratio powdered gelatin, where a denser foam typically needs a 1.0% to 1.7% ratio. When making marshmallows a ratio of 10% of the liquid is called for.
If you are using sheet gelatin you will use 0.3-0.5 sheets per 100 grams of liquid for soft gels and 0.5 to 1.66 sheets per 100 grams of liquid for firmer gels. For very firm gels more than 3.3 sheets per 100 grams of liquid is sometimes used. For a light foam use 0.2 to 0.5 sheets per 100 grams of liquid, a dense foams requires 0.5 to 0.9 sheets per 100 grams of liquid. When making marshmallows a ratio of 5.5 sheets per 100 grams of liquid is common.
For more information you can view my Guide to Gelatin.
Methylcellulose
Methylcellulose has the uncommon ability to gel as it heats, and melt as it cools. There are many different types of methylcellulose available for a variety of uses.
For making foams, a ratio mixture of 1.0-2.0% Methocel F50 with 0.1-0.3% xanthan gum is commonly used. For gels a ratio range of 0.25-3.0% Methocel A4C is a good starting point.
For more information check out my Guide to Methocel F50 and my Guide to Methocel A4C.
Sodium Alginate
Sodium alginate is commonly used in spherification because of its ability to gel in the presence of calcium ions. It can be dispersed and hydrated at almost any temperature and the gels are very heat tolerant.
For direct spherification a 0.5% to 1% sodium alginate base is used with a 0.5% to 1% calcium lactate setting bath. For reverse spherification a 1.0 to 3.0% calcium lactate base is used with a 0.4% to 0.5% sodium alginate bath.
Discover more information by visiting both my Guide to Sodium Alginate and my Guide to Calcium Lactate.
Other Gelling Agents
There are many other gelling agents we do not cover in depth but can be found in the Other Ingredients section such as lambda carrageenan, gellan, and pectin.

Properties of GelsTop
There are many types of gels, ranging from soft and tender to hard and firm. Understanding the different properties of gels is critical to successfully making your own gels.
Gel Spectrums
One of the biggest hurdles I had when learning about modernist cooking was understanding the vocabulary for the different properties of gels. I will explain the properties as a spectrum to help put these in perspective of one another.
Different ingredients, and different concentrations of ingredients, can move the gel along these spectrums. For instance, agar gels are brittle and iota carrageenan forms elastic gels. But if you combine agar with locust bean gum the gel begins to become more elastic.
Brittle vs Elastic
All gels fall somewhere on the brittle vs elastic spectrum. On the brittle side, gels easily fall apart with pressure; they are grainy and crumble easily. Conversely, elastic gels are more flexible, jiggly, and chewy. Gummy bears are a good example of an elastic gel.
Soft vs Firm
All gels also lie somewhere on the soft vs firm spectrum. Soft gels give under pressure and have a much more tender texture. Firm gels resist pressure and hold their shape better. The softness or firmness of most gels can be controlled by the amount of gelling agent used. Adding a higher percent of a gelling agent results in a firmer gel. Custards and Jell-O are a good example of soft gels and gummy bears are a firm gel.
Sticky vs Clean
The final spectrum that gels are on is sticky vs clean. Sticky gels tend to adhere to surfaces, and your mouth, similar to taffy or caramel. Clean gels do not stick to other substances, similar to Jell-O.

Other Properties of Gels
There are many other properties that a gel can have. Depending on how you are planning to use a gel they may or may not be important for any given preparation.
Setting Temperature
The setting temperature of a gel is the temperature below which the gel will form. For instance, gelatin has to be refrigerated before it sets while agar will set once it drops below 45°C (113°F). However, an exception to this is methylcellulose gels which actually set above a certain temperature, not below it.
Melting Temperature
The melting temperature of a gel is the temperature above which it will unset and become a liquid again. For example, gelatin tends to melt at a hot picnic while agar can be heated up to 80°C (176°F) before it begins to melt. Not all gels have a melting temperature, such as thermo-irreversible gels which never melt.
Syneresis
Syneresis is the leaking out, or weeping, of liquids from a gel. Sometimes this is the desired result such as when using a gel to clarify a liquid. However, most of the time syneresis is unwanted. Different gels have different levels of syneresis which can often be prevented by combining one or more ingredients. Locust bean gum is typically good at preventing syneresis with other gelling agents.
Clarity
The clarity of a gel is simply how clear it is. Gels can range from transparent to opaque. This is affected by the gelling ingredients and also the opacity of the liquid that makes up the gel.
Flavor Release
How well a gel will release the flavors of the liquid it is made of is referred to as its flavor release. Some gelling agents like gelatin have good flavor release while others tend to lock up the flavors.
Freeze-Thaw Stability
If a gel can be frozen and then thawed without losing its structure it is considered freeze-thaw stable. This is a very important consideration if the gel is a part of foods made to be frozen and thawed.
Hysteresis
This is a very interesting property of gels. It basically means that the setting and melting temperatures are not the same. The higher the hysteresis, the larger the gap between the temperatures. For instance, water sets and melts at 0°C (32°F), so if it's below 0°C (32°F) it will freeze, and if it's above 0°C (32°F) then it will melt.
Agar, on the other hand, has a setting temperature around 40°C (104°F) and a melting temperature of 85°C (185°F). This means if agar is a solid, then it will remain a solid until heated above 80°C (176°F). Then as it cools, it will remain a liquid until it goes below 40°C (104°F). The result is between 40°C (104°F) and 80°C (176°F) an agar gel can be either a solid or a liquid.
Particle Suspending
As discussed early, a gel is typically a solid structure that traps liquid. However, this structure can also trap other solid particles in it, suspending them. This is very useful for holding herbs in a vinaigrette or tomato chunks in a puree.
Thermoreversibility
If a gel can be set and then melt, like Jell-O melting on a warm day, then it is considered thermoreversible. If the gel cannot be unset, like a soufflé, then it is considered thermoirreversible. Most thermoreversible gels can be set and unset many times without a loss in gelling strength.
Shear Thinning or Thixotropy
Both of these terms refer to the ability to act like a set gel when at rest and to flow when agitated, as through whisking, stirring, or blending. This can be a very nice effect, especially for sauces you want to coat food with or for purees that need extra body. This is a common property in fluid or sheared gels.
I refer to these terms interchangeably, and for the home cook they really are. However, they do have some differences, especially in the academic vs industrial sectors. For an interesting look at Thixotropy vs shear thinning, you can read the comments on the Wikipedia merge request: //en.wikipedia.org/wiki/Talk:Shear_thinning.
How To Shape GelsTop
One of the most interesting uses of gels is the different shapes you can create with them. From standard cubes to spheres and noodles, the shapes help add visual appeal to dishes.

Serving Dishes
For soft gels, it is best to have them set directly in the dish you want to serve them in. Soft gels have a tendency to break apart if you try to cut or unmold them. You can also set harder gels in the serving dishes and it can have a great visual appeal, especially if you are using glass serving dishes.
Free Form
The easiest way to shape gels is by setting it in a block and then cutting it into the shapes you prefer. I will often use a Tupperware container that the gel will fill to the final height I am looking for, typically 6 mm to 25 mm (1/4" to 1"). I can then cut it into cubes with a knife, or for harder gels I can even use cookie cutters for a wide range of shapes.
Sheets
For many elastic gels, you can set them in a thin layer, less than 3 mm (1/8") thick on a flat, plastic surface. This creates a flexible sheet you can drape over or wrap around foods.
Molds
Another easy way to set creatively shaped gels it to use molds. These can be in the form of silicon or plastic molds. There are ice cube trays you can use that come in a wide variety of shapes and sizes. In addition, there are hemispherical and spherical molds of different sizes that can be used for interesting shapes.

Noodles
Another interesting presentation is making gel noodles. These have many uses but are typically used as a garnish. To make the gel noodles the warm gel base is pushed into plastic tubing, usually using a plastic syringe, and then placed in ice water to cool. Be sure you use elastic gels when making noodles otherwise they will fall apart when being handled.
Pearls
Round beads of gel always add some great visual appeal to plates. There are a few ways to make them but I've found the easiest is to make them in cold oil. Place a glass of oil in the freeze for about an hour so it thickens slightly. You can use any type of oil but canola, vegetable, or olive oil works well.
Make the gel base and then drip it into the oil. While the gel is falling to the bottom of the oil it is in a spherical shape and because the oil is cold the gel will set before it falls to the bottom.
How to Make Agar GelsTop
Creating a gel with agar results in a brittle gel. The firmness of the gel will depend on how much agar is used. You can make the gel more elastic by adding locust bean gum or gelatin to the flavored liquid when the agar is added.
Making an agar gel takes just a few steps. First, disperse the agar in the flavored liquid you want to gel using a whisk or blender. Then bring the liquid to a boil for 3 to 5 minutes. Pour the liquid into molds and let it set at room temperature.
The gel will set at 40 to 45°C (104 to 113°F) and remain a gel as long as it stays below 80°C (176°F). Agar gels will usually range from 0.2% agar in a very soft gel to 3.0% agar in very firm gels. If you are making the gel more elastic you can replace from 5% to 15% of the agar with locust bean gum.
Examples of Agar Gels
View more agar gel recipes, learn more about how to use agar , or how to measure modernist ingredients for more information on ratios.
How to Make Carrageenan GelsTop
Carrageenan is another common gelling ingredient and has actually been used in Ireland and Europe for hundreds of years to create milk, cream, and other dairy puddings. It can also be used to make fluid gels, foams, and to thicken liquids. It works very well with dairy based products. It can be used in hot or cold preparations, though it sets much firmer when cold.

There are three different types of carrageenan: iota, kappa, and lambda. Each type of carrageenan has unique properties. The three types can also be combined with each other to create a variety of textures in gels. Iota and kappa are the most commonly used and I employ them in recipes on this site.
To make a carrageenan gel first disperse the carrageenen into a cold liquid. Heat the liquid above 70°C (158°F) and then let it cool below 35°C to 70°C (95°F to 158°F) to set. The setting temperature is affected by the ratio of carrageenan used and the amount of calcium present in the liquid, which is why there is such a wide range. It typically takes several hours to set and is usually done in the refrigerator.
Carrageenan Ratios
- Iota Carrageenan Ratios
- 0.02-0.04% thicken dairy
- 0.75-1.5% gels
- 0.4-1.5% dairy gels
- 0.1-1.0% dairy fluid gels when blended 0.2-1.0% foams from fluid gels
- Kappa Carrageenan Ratios
- 0.3-1.5% dairy gels
- 0.3-1.0% dairy fluid gels when blended
- Carrageenan Elasticity Ratios
- 0.3-1.5% total carrageenan for gels
- 1 iota to 1 kappa for medium elasticity 2 iota to 1 kappa for elastic gels
- 1 iota to 2 kappa for brittle gels
Examples of Carrageenan Gels
View more carrageenan gel recipes, learn more about how to use carrageenan, or how to measure modernist ingredients for more information on ratios.
How to Make Gelatin GelsTop
Gelatin is one of the more well known modernist ingredients, mainly due to its use in Jell-O. However, gelatin has a lot more uses than simply making wiggly cubes. It can create soft panna cottas, elastic gel sheets, light foams, and even marshmallows. Without other stabilizers, gelatin has to be used for cold preparations, otherwise it will melt and lose its form.
There are two types of gelatin: powdered and sheet. They are basically interchangeable with 1 sheet of gelatin for every 1.8 grams of powdered gelatin. I've given both amounts for the recipes on this website.
To create a gelatin gel you first have to "bloom" the gelatin by letting it sit in a cold liquid for 5 to 10 minutes. This blooming process hydrates the gelatin and allows it to gel the liquid. Once bloomed, the liquid has to be heated enough for the gelatin to dissolve into it, about 50°C (122°F).
Once the gelatin is dissolved the liquid can be poured into a container or mold to set into a gel inside the refrigerator.
Gelatin Ratios By Weight
- Powdered Gelatin Ratios
- 0.5-1.0% soft gels
- 1.0-6.0% hard gels
- 10% of liquid for marshmallows
- Sheets Per 100 Grams Liquid
- 0.3-0.5 sheets, soft gels
- 0.5-3.3 sheets, hard gels
- 5.5 sheets, marshmallows
Examples of Gelatin Gels
View more gelatin gel recipes, learn more about how to use gelatin, or how to measure modernist ingredients for more information on ratios.

How to Make Gel NoodlesTop
Most gel noodles are made with agar. It is mixed into a liquid and hydrated, then pushed into tubing to cool. Once it's cool, it is removed from the tubing and can be used as noodles or garnish. A 1% ratio of agar usually works very well but for a stronger noodle I will use 0.9% agar and 0.1% locust bean gum.
Examples of Gel Noodles
View more gel noodle recipes, learn more about how to use agar, or how to measure modernist ingredients for more information on ratios.
How to Make Gel CubesTop
The two main ways to make gel cubes are with gelatin or agar, but any gelling agents can be used. I tend to use agar because it holds up to hot temperatures better than the other ingredients and it is firmer and easier to handle. However, the melt-in-your-mouth properties of gelatin or carrageenan can't be replicated with it.
A 1% ratio of agar usually works very well but for a stronger noodle I will use 0.9% agar and 0.1% locust bean gum. For gelatin a 2% to 3% gel is a good place to start.
Depending on the firmness of the gel being cubed, you can either make a big hunk of gel and then cut it, or gel it directly into square molds.
Examples of Gel Cubes
View more gel cube recipes, learn more about how to use agar, or how to measure modernist ingredients for more information on ratios.
How to Make Gel SheetsTop
Gel sheets are thin sheets of gel, similar in thickness to a flour tortilla but made entirely of a gelled liquid. There are many ingredient combinations you can use for gel sheets but I usually use a 0.9% agar and 0.1% locust bean gum mixture or a 1.2% agar and 1.4% gelatin combination. Both of these result in good gel sheets.
The gel sheets are made by adding the gelling ingredients to a liquid and hydrating them then pouring the liquid onto parchment paper or a silicon mat in a very thin layer. Once the gel fully sets the sheet can be used.
Gel sheets can be used as a garnish or topper for dishes or cut into rounds and used like ravioli.
Examples of Gel Sheets
View more gel sheet recipes or how to measure modernist ingredients for more information on ratios.
How to Make Gel PearlsTop
Gel pearls are made by adding agar to a liquid and hydrating it. The liquid is then dripped into a glass of very cold oil. As the liquid sinks it forms into a sphere which then gels.
Examples of Gel Pearls
View more gel pearls recipes or how to measure modernist ingredients for more information on ratios.
How to Make Fluid GelsTop
Fluid gels are a special type of gel that behaves as both a gel and a liquid. They may look like a gel and taste like a liquid, or look like a liquid but suspend other particles like a gel does.
The best known example of a fluid gel is ketchup. It looks and acts like a gel in the bottle and will not come out despite your best efforts. Then suddenly, the shear forces are enough and the gel turns into a liquid and flows quickly all over your plate.
Fluid gels are made by first gelling a liquid and letting it set. Once it has fully set, the liquid is blended into a puree and this puree is a fluid gel that is ready to use.

When to Use Fluid Gels
Fluid gels have many of the same uses as thickened liquids but there are some specific differences between them.
Thicker Liquids
Unlike many thickeners, such as xanthan gum, fluid gels can be made very thick without developing bad textures. This helps create sauces with the consistency of ketchup or even pudding without developing unfavorable mouthfeel. If you tried to use xanthan gum to thicken the same amount it would develop an unappealing mucus-like texture.
Stays in Place
Because fluid gels act like a gel when they are stationary they tend to stay put on the plate better. This is nice if you have different sauces for different items, or if the sauces are a separate, decorative element. Also, unlike thickened liquids, they thin out when eaten, so the texture in the mouth can be different than the texture on the plate.
Particle Suspension
The suspension of particles can be accomplished both with a fluid gel and a thickened liquid. However, a thickened liquid will feel thick in the mouth while the fluid gel will feel thin and fluid. This is why many beverages with particles in them, such as fruit juices and flavored milks, use fluid gels instead of thickened liquids, they are more palatable.
Fluid Gel Process
Fluid gels are very easy to create. You first make a standard gel using one of a subset of the above gelling agents. You can adjust the initial thickness of the fluid gel by changing the concentration of the gelling ingredient. Once the gel sets you puree it in a standing blender or with an immersion blender until smooth. You can change the thickness of the pureed gel by adding xanthan gum to thicken it or liquid to thin it out.
Fluid Gel Containers
I try to use a container that works well with my immersion blender so I can blend it directly in the container, but any container will work. If you need it to gel more quickly, try to use a container that is wide and flat, so the gel will not be as thick and will set faster.
Fluid Gel Ingredients
A few of the gelling agents work well for the creation of fluid gels. I've found best results for cold gels with agar, iota and kappa carrageenan, and gelatin. For hot gels, agar is really the only ingredient in this information that can hold up to the heat. Gellan, which we don't cover in depth, is also commonly used.
Pre-Made Fluid Gel
If you find yourself making fluid gels on a regular basis or want to gel raw ingredients, you can sacrifice some flavor by using premade fluid gels. Simply make a gel with water and 1% agar and let it set. It will last covered in the refrigerator for a week or two.
When you want to turn a liquid into a fluid gel you puree it with some of the pre-made fluid gel. Start with a small amount and continue adding more until the liquid is the texture you prefer. Because of the water content it will dilute the liquid some but the convenience can be worth it.
Examples of Fluid Gels
View more fluid gel recipes or how to measure modernist ingredients for more information on ratios.
Looking for More Articles?Top
Gelification Recipes

This Raspberry Gel is great for various sweet applications and is part of our Chocolate Canelé - PB&J Style recipe.
Duck is one of my favorite meats to eat. I love the combination of tender meat with rich, creamy fat. In this recipe I pair it with some grilled asparagus and a blackberry-port pudding made from an agar fluid gel.
Trying to find a good substitute for locust bean gum can be tricky, especially when it is called for with agar, but there are some other combinations that might work.
I turn the sous vided brisket or chuck roast into shredded beef for flavorful carnitas covered in a sweet and spicy tangerine-chipotle sauce. I serve them with corn tortillas and avocado so they are easy to pick up and eat.
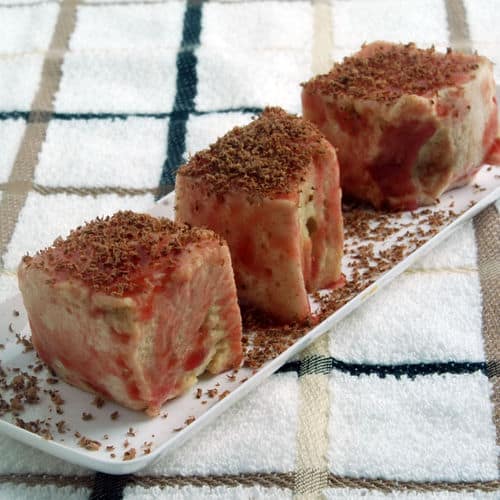
For a modern twist on this clam chowder with smoked clams recipe I gel the chowder, cube it, and serve it on a crunchy sourdough crouton with a smoked clam on top. A tasty and talked about party treat!
These mango noodles add a great flavor punch and visual touch to dishes. I like to serve them draped over ice cream or a sundae but they can also be heated and served with jerk pork or as a garnish on an Asian citrus salad.
This crostini recipe moves the traditional deli food of lox and cream cheese on a bagel into fancy modernist bites. The cream cheese is turned into gelled noodles that are served on toasted bagel rounds with pickled red onion. An easy to pick up and deliciously flavorful party food!
For a PB and J dessert worthy of a party, I make a home-made cashew butter to replace the peanut butter and then turn some fresh raspberries into a flavorful fluid gel for the jelly. I serve it with a sliver of dark chocolate for richness and a lemon twist to add brightness. When served open face it better highlights the flavors.
Roasted red peppers are a classic Italian offering and this recipe uses the whipping siphon to aerate them into a light, smooth soup. The amount of agar can be adjusted to
easily control the thickness of the soup. In addition to serving it as a soup, this foam can be used in many
different ways to turn traditional dishes into modern masterpieces.
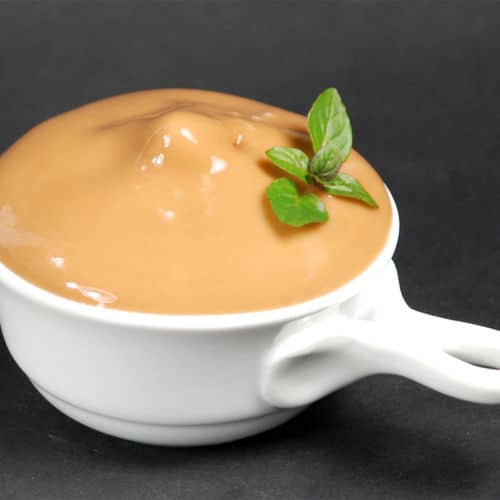
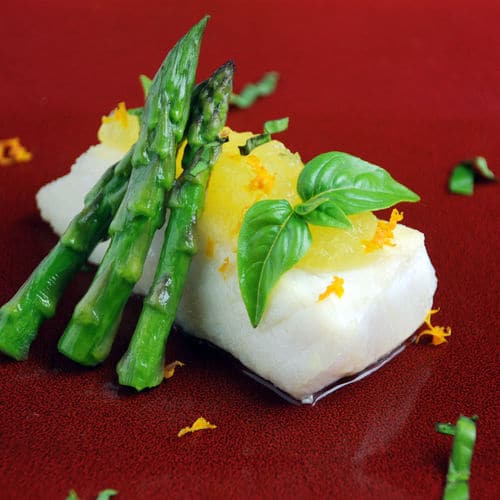
I really like how the halibut goes with the sweet and tart citrus pudding. This is a simple dish but one that is full of subtle flavors. The orange and lemon help complement the halibut and the basil adds just a hint of spice to it.
Looking to take your guests by surprise visually but still deliver that familiar and well-loved taste of peas and carrots? This recipe tops a roasted carrot plank with pea pudding and some pancetta for added flavor and texture. Zip it up with a modernist twist!
For these fun and flavorful party desserts I make a gelled ravioli from bananas and cream and fill them with Nutella. Just top them off with some shaved chocolate and mint leaves or serve them with ice cream - either way it is a crowd pleaser!
This thicker blackcurrant foam recipe is full of flavor. It can be used on desserts to add some sweet and tart flavor or as a sauce to liven up a fish entree.
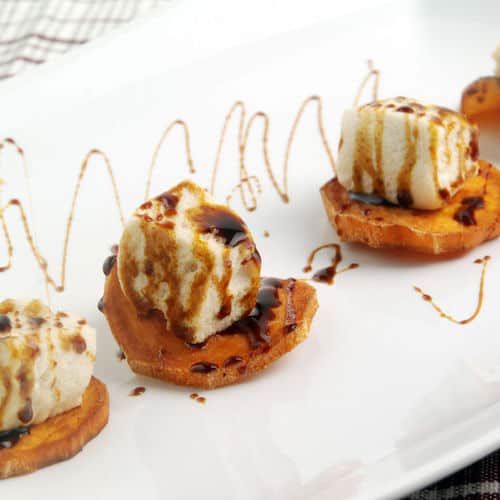
For this dessert I've taken the components from my mom's sweet potato casserole and broken them down into a modernist dessert. I take crispy sweet potato chips and top them with a fresh orange and brown sugar marshmallow. Then I finish it with a drizzle of molasses for extra flavor.
This recipe takes classic homemade marshmallows and covers them in yummy chocolate. Mint and chocolate is a classic pairing and the soft marshmallows are a great way to hold them all together! A definite party favorite!
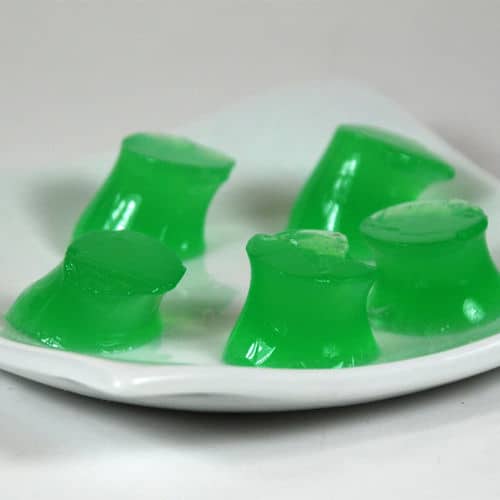
This is a tastier take on the commonly served Jell-O shot
especially if you top them with some candied lime peel
and a little sprig of mint. You can even substitute any of your favorite drinks into this recipe - let your imagination run wild!
This recipe produces a thick chocolate foam that is a tasty fun way to top ice cream or brownies. It makes a wonderful smooth dessert when served by itself with just a sprinkle of cinnamon and powdered sugar topping it off!
Bacon and bourbon are two of my favorite foods and this recipe combines them in a smokey, spicy BBQ sauce that is great on wings, pulled pork, brisket, or about anything
else you can think of. The sauce itself is really tasty but the bacon chunks add great bursts of flavor.
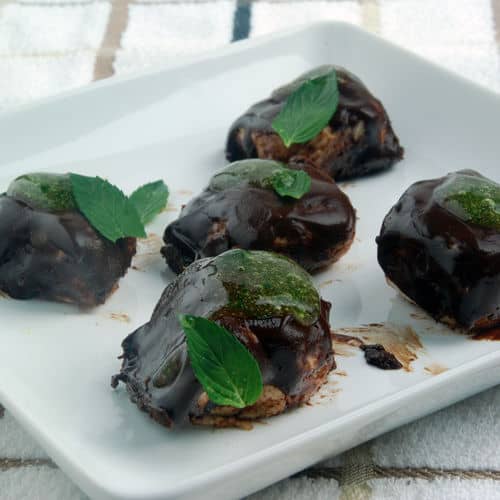
Using a marshmallow base turns a rich, decadent chocolate covered cherry into a lighter equally satisfying treat. I add cocoa powder to the marshmallow mixture, resulting in a light chocolate flavor and cherry juice is turned into a marshmallow coating. These addictive snacks have great flavor and are a visually interesting dish that will get your guests talking!
Tikka masala is a traditional English dish at curry houses. With this recipe I reimagined it as a modernist dish by turning the sauce into a gelled coating; it's s a fun play on a old classic!
What to serve your guests something a little different but exceptional for dinner? In this dish I topped sesame noodles with shredded duck legs because they can hold up to the strong flavors of the pasta. You can serve this entree either hot or cold. It's sure to be a hit!
For this recipe I make a foam instead of using the normally thin liquid associated with a dish of mussels. After removing the mussels from their shells, I serve them individually with the curry foam on top. This exceptional mussel bite turns a messy meal into an elegant and easy to eat party food.
The star of most of my parties is meat and this blackberry-peach wrapped sous vided pork offering is no exception! It makes a fun presentation besides the additional sweetness and flavor from roasting the fruit complements the pork perfectly.
This recipe infuses milk with the great flavor of maple and pecan then turns it into a tender panna cotta dessert. The common modernist gelling ingredients of iota carrageean and kappa carrageenan are used to make the panna cotta portion; an immersion blender and a whipping siphon are both modernist equipment used to make this delicate ending to your meal.
White chocolate foam dispensed over ripe berries, it does not get much better than that! This recipe will wow your guests.
This great party snack use a crispy bacon base topped with a creamy corn custard and a spicy poblano chile fluid gel to make a rich and complex one-bite snack.
Cosmos are becoming a more and more popular drink and I mix it up by making different flavors of cosmo and by adding some flair in the form of a fruit gelatin foam from a whipping siphon.
Using sous vide infused vanilla-orange vodka makes this modernist cocktail extra flavorful and the half and half adds a richness that cannot be beat.
This modernist dessert is a take off of an old fashioned sweet potato, brown sugar and marshmallow casserole. Here I take crispy sweet potato chips, top them with a fresh orange and brown sugar marshmallow and finish it with a drizzle of molasses for extra flavor. This treat is a hit at every party!
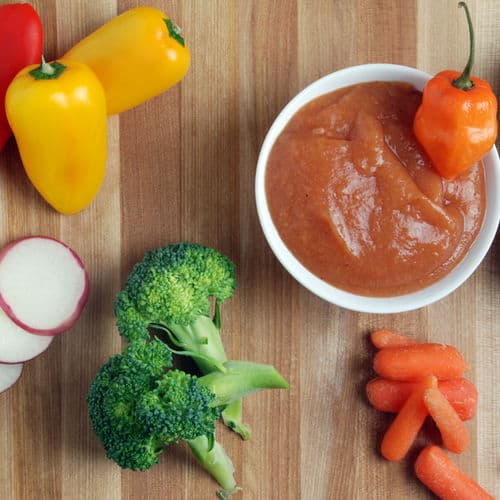
This dip recipe combines the spicy heat of habanero peppers with the sweet taste of fresh ripe peaches. The resulting tangy dip is great on vegetables or even meat. By altering the amount of peppers used, you can raise or lower the heat to suit your guests.
Tequila has a bad reputation as a party drink but you can tame it if you replace the shots with this sophisticated cocktail. The paloma is a traditional Mexican cocktail and is much more common than a margarita south of the border. It is usually made with tequila and a grapefruit soda, such as squirt, served over ice, and is both easy to make and delicious.
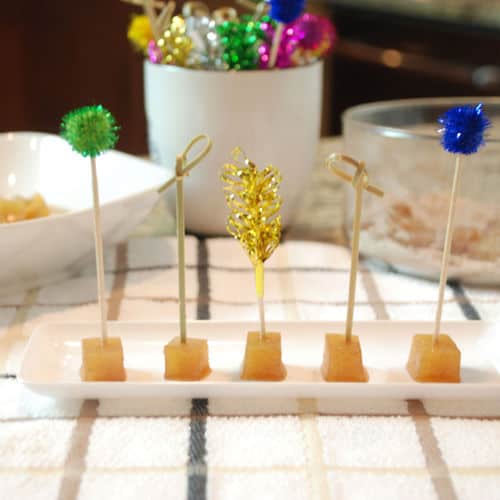
These gel cubes are super easy to put together and they make a great small bite for people to enjoy. The quality of the cider you use will directly relate to how good the gels turn out.
These cocktail cubes are a fun way to entertain your guests. They are rum infused strawberries encased in a daiquiri cube. When you bite into them the cube starts off with a sweet and tart flavor followed up by the kick of the rum-infused strawberries.
One of my favorite spring dishes is shortcakes with fresh fruits or berries. The other day I decided to take advantage of some great looking berries and made a variety of shortcakes. To make them more modern, and to work on some recipes for my upcoming book, I used some
whipping siphon foams and
agar agar fruit gels.
Locust bean gum is taken from the seeds of the Mediterranean carob or locust bean tree. It is good at thickening liquids and stabilizing emulsions. It can be used by itself but is more often used to complement other ingredients.
These Mexican inspired salmon bites pack a lot of flavor in a little package. The acidity from the tomatillos compliments the salmon perfectly and the crunch from the fried tortillas adds great texture.
These instant noodles make for an awesome presentation. They are created in the bowl of soup in front of the diner, or the diner can even make the noodles themselves. They are based off of Wylie Dufresne's instant tofu noodles.
One interesting use of modernist gelling is to create pliable gel sheets. These gel sheets are made by adding a combination of agar agar and gelatin to a flavored liquid and letting it set. The agar and gelatin add both elasticity for strength and a nice brittleness for flavor release. The ratio of the two ingredient will determine the final characteristic of the gel sheets.
Marshmallows are a favorite food of children everywhere. These homemade ones are so much better than store bought that there is really no comparison. Whether you want to eat these on smores, in hot cocoa or just plain they will amaze you and your friends.
Iota carrageenan can be used to thicken liquids and stabilize emulsions or foams. It's also very adept at creating gels. Iota carrageenan works best with dairy products but can be used with a variety of liquids.
Agar, or agar agar, is a gelling agent extracted from red algae. It is commonly used to stabilize foams and to thicken or gel liquids. It is relatively easy to work with and a good starting point for modernist cooking.
This creamy iota carrageenan custard is full of poblano flavor and great as an addition to many different dishes. You can serve it alongside pork chops or pork belly, or even as a side with fish.
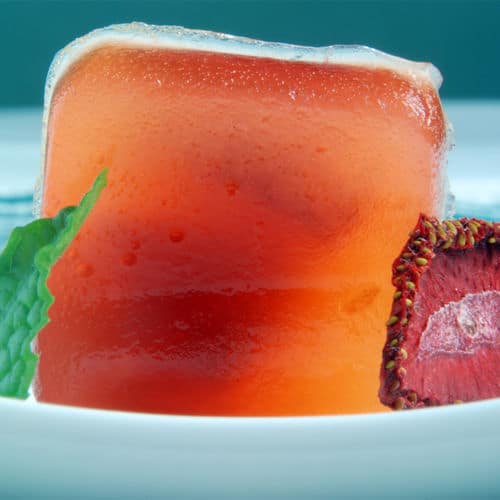
My wife's relatives in Florida love their Bloody Marys and this is her modernist take on them, focusing on the celery garnish and turning it into the serving vessel a la the traditional "ants on a log" children's snack.
One of the fun things about modernist cooking is changing the textures of common dishes while keeping the flavors the same. This creates almost a confusion in the palate when it's being eaten and the brain recognizes the flavors but not the textures. This recipe creates a solid Bloody Mary gel with agar agar that has applications in various dishes.
These agar gel cubes are a great way to add a unique visual style to a dish, as well as creating little bursts of papaya. You could use a similar agar recipe to gel many different liquids, depending on the dish you are creating.
Although you can now buy lemon curd in most supermarkets, it is extremely simple to make in your water oven, and the homemade version doesn't contain any preservatives or artificial flavors. Traditional recipes require cooking the lemon-egg mixture in a double boiler until the curd thickens. This can be tricky, as one or two degrees can make the difference between success and disaster. With the sous vide technique, the curd cooks itself without any stress or stirring.
Gels are a very common technique in modernist cooking. This modernist recipe uses the gelling properties of agar agar to make papaya noodles. These agar agar noodles are a great addition to a several different dishes and are an easy way to add a touch of flair.
The use of gels in cooking is not a completely modern innovation. As a matter of fact, it dates back in history as far as early as the 1600's in Europe where it was derived from the bones of animals. In Asia, it is part of many traditional dishes which use plant extracts. This classic cooking component and technique has taken on a new life in the form of fluid gels in modern cuisine.
One of the easiest molecular gastronomy recipes to try is by creating "pearls". Most pearls are solid jelly balls that can be used to garnish dishes or as an amuse-bouche. Here we use sweet-sour balsamic vinegar to make pearls that are a great way to add a hit of flavor to many different dishes. The process of making them is even pretty easy.
This article is by me, Jason Logsdon. I'm an adventurous home cook and professional blogger who loves to try new things, especially when it comes to cooking. I've explored everything from sous vide and whipping siphons to pressure cookers and blow torches; created foams, gels and spheres; made barrel aged cocktails and brewed beer. I have also written 10 cookbooks on modernist cooking and sous vide and I run the AmazingFoodMadeEasy.com website.
Affiliate Disclaimer: Some links on this site might be affiliate links that if used to purchased products I might receive money. I like money but I will not endorse something I don't believe in. Please feel free to directly go to any products I link to and bypass the referral link if you feel uncomfortable with me receiving funds.
If so, please join the more than 19,000 people who receive my exclusive newsletter and get a FREE COPY of my printable modernist ingredient cheatsheet.
Just click on the green button below!
Get Started!
Thanks for signing up! I look forward to sending you recipes, links, and exclusive content and offers that you can't find anywhere else on the site, and I'll send you a free copy of my modernist ingredient cheatsheet too!
Enter your first name and email below, and I'll see you on the inside!
Thanks for signing up! I look forward to guiding you through the process of discovering sous vide with amazing articles, recipes, and tips and tricks you can use to impress your friends and family by turning out amazing food time and time again!
Enter your first name and email below, and I'll see you on the inside!


 This Raspberry Gel is great for various sweet applications and is part of our Chocolate Canelé - PB&J Style recipe.
 Duck is one of my favorite meats to eat. I love the combination of tender meat with rich, creamy fat. In this recipe I pair it with some grilled asparagus and a blackberry-port pudding made from an agar fluid gel.
 Trying to find a good substitute for locust bean gum can be tricky, especially when it is called for with agar, but there are some other combinations that might work.
 I turn the sous vided brisket or chuck roast into shredded beef for flavorful carnitas covered in a sweet and spicy tangerine-chipotle sauce. I serve them with corn tortillas and avocado so they are easy to pick up and eat.
 For a modern twist on this clam chowder with smoked clams recipe I gel the chowder, cube it, and serve it on a crunchy sourdough crouton with a smoked clam on top. A tasty and talked about party treat!
 These mango noodles add a great flavor punch and visual touch to dishes. I like to serve them draped over ice cream or a sundae but they can also be heated and served with jerk pork or as a garnish on an Asian citrus salad.
 This crostini recipe moves the traditional deli food of lox and cream cheese on a bagel into fancy modernist bites. The cream cheese is turned into gelled noodles that are served on toasted bagel rounds with pickled red onion. An easy to pick up and deliciously flavorful party food!
 For a PB and J dessert worthy of a party, I make a home-made cashew butter to replace the peanut butter and then turn some fresh raspberries into a flavorful fluid gel for the jelly. I serve it with a sliver of dark chocolate for richness and a lemon twist to add brightness. When served open face it better highlights the flavors.
 Roasted red peppers are a classic Italian offering and this recipe uses the whipping siphon to aerate them into a light, smooth soup. The amount of agar can be adjusted to
easily control the thickness of the soup. In addition to serving it as a soup, this foam can be used in many
different ways to turn traditional dishes into modern masterpieces.
Roasted red peppers are a classic Italian offering and this recipe uses the whipping siphon to aerate them into a light, smooth soup. The amount of agar can be adjusted to
easily control the thickness of the soup. In addition to serving it as a soup, this foam can be used in many
different ways to turn traditional dishes into modern masterpieces.
 I really like how the halibut goes with the sweet and tart citrus pudding. This is a simple dish but one that is full of subtle flavors. The orange and lemon help complement the halibut and the basil adds just a hint of spice to it.
 Looking to take your guests by surprise visually but still deliver that familiar and well-loved taste of peas and carrots? This recipe tops a roasted carrot plank with pea pudding and some pancetta for added flavor and texture. Zip it up with a modernist twist!
 For these fun and flavorful party desserts I make a gelled ravioli from bananas and cream and fill them with Nutella. Just top them off with some shaved chocolate and mint leaves or serve them with ice cream - either way it is a crowd pleaser!
 This thicker blackcurrant foam recipe is full of flavor. It can be used on desserts to add some sweet and tart flavor or as a sauce to liven up a fish entree.
 For this dessert I've taken the components from my mom's sweet potato casserole and broken them down into a modernist dessert. I take crispy sweet potato chips and top them with a fresh orange and brown sugar marshmallow. Then I finish it with a drizzle of molasses for extra flavor.
 This recipe takes classic homemade marshmallows and covers them in yummy chocolate. Mint and chocolate is a classic pairing and the soft marshmallows are a great way to hold them all together! A definite party favorite!
 This is a tastier take on the commonly served Jell-O shot
especially if you top them with some candied lime peel
and a little sprig of mint. You can even substitute any of your favorite drinks into this recipe - let your imagination run wild!
This is a tastier take on the commonly served Jell-O shot
especially if you top them with some candied lime peel
and a little sprig of mint. You can even substitute any of your favorite drinks into this recipe - let your imagination run wild!
 This recipe produces a thick chocolate foam that is a tasty fun way to top ice cream or brownies. It makes a wonderful smooth dessert when served by itself with just a sprinkle of cinnamon and powdered sugar topping it off!
 Bacon and bourbon are two of my favorite foods and this recipe combines them in a smokey, spicy BBQ sauce that is great on wings, pulled pork, brisket, or about anything
else you can think of. The sauce itself is really tasty but the bacon chunks add great bursts of flavor.
Bacon and bourbon are two of my favorite foods and this recipe combines them in a smokey, spicy BBQ sauce that is great on wings, pulled pork, brisket, or about anything
else you can think of. The sauce itself is really tasty but the bacon chunks add great bursts of flavor.
 Using a marshmallow base turns a rich, decadent chocolate covered cherry into a lighter equally satisfying treat. I add cocoa powder to the marshmallow mixture, resulting in a light chocolate flavor and cherry juice is turned into a marshmallow coating. These addictive snacks have great flavor and are a visually interesting dish that will get your guests talking!
 Tikka masala is a traditional English dish at curry houses. With this recipe I reimagined it as a modernist dish by turning the sauce into a gelled coating; it's s a fun play on a old classic!
 What to serve your guests something a little different but exceptional for dinner? In this dish I topped sesame noodles with shredded duck legs because they can hold up to the strong flavors of the pasta. You can serve this entree either hot or cold. It's sure to be a hit!
 For this recipe I make a foam instead of using the normally thin liquid associated with a dish of mussels. After removing the mussels from their shells, I serve them individually with the curry foam on top. This exceptional mussel bite turns a messy meal into an elegant and easy to eat party food.
 The star of most of my parties is meat and this blackberry-peach wrapped sous vided pork offering is no exception! It makes a fun presentation besides the additional sweetness and flavor from roasting the fruit complements the pork perfectly.
 This recipe infuses milk with the great flavor of maple and pecan then turns it into a tender panna cotta dessert. The common modernist gelling ingredients of iota carrageean and kappa carrageenan are used to make the panna cotta portion; an immersion blender and a whipping siphon are both modernist equipment used to make this delicate ending to your meal.
 White chocolate foam dispensed over ripe berries, it does not get much better than that! This recipe will wow your guests.
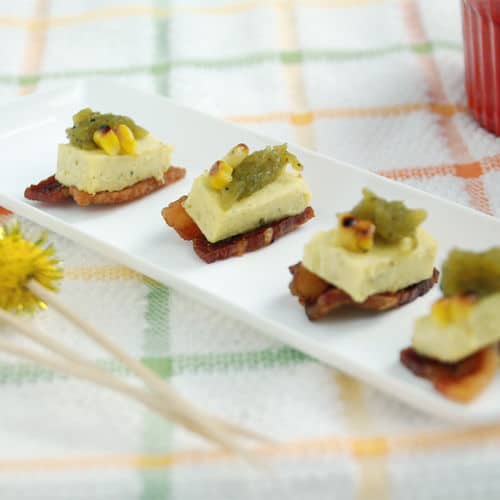 This great party snack use a crispy bacon base topped with a creamy corn custard and a spicy poblano chile fluid gel to make a rich and complex one-bite snack.
 Cosmos are becoming a more and more popular drink and I mix it up by making different flavors of cosmo and by adding some flair in the form of a fruit gelatin foam from a whipping siphon.
 Using sous vide infused vanilla-orange vodka makes this modernist cocktail extra flavorful and the half and half adds a richness that cannot be beat.
 This modernist dessert is a take off of an old fashioned sweet potato, brown sugar and marshmallow casserole. Here I take crispy sweet potato chips, top them with a fresh orange and brown sugar marshmallow and finish it with a drizzle of molasses for extra flavor. This treat is a hit at every party!
 This dip recipe combines the spicy heat of habanero peppers with the sweet taste of fresh ripe peaches. The resulting tangy dip is great on vegetables or even meat. By altering the amount of peppers used, you can raise or lower the heat to suit your guests.
 Tequila has a bad reputation as a party drink but you can tame it if you replace the shots with this sophisticated cocktail. The paloma is a traditional Mexican cocktail and is much more common than a margarita south of the border. It is usually made with tequila and a grapefruit soda, such as squirt, served over ice, and is both easy to make and delicious.
 These gel cubes are super easy to put together and they make a great small bite for people to enjoy. The quality of the cider you use will directly relate to how good the gels turn out.
 These cocktail cubes are a fun way to entertain your guests. They are rum infused strawberries encased in a daiquiri cube. When you bite into them the cube starts off with a sweet and tart flavor followed up by the kick of the rum-infused strawberries.
 One of my favorite spring dishes is shortcakes with fresh fruits or berries. The other day I decided to take advantage of some great looking berries and made a variety of shortcakes. To make them more modern, and to work on some recipes for my upcoming book, I used some
  Locust bean gum is taken from the seeds of the Mediterranean carob or locust bean tree. It is good at thickening liquids and stabilizing emulsions. It can be used by itself but is more often used to complement other ingredients.
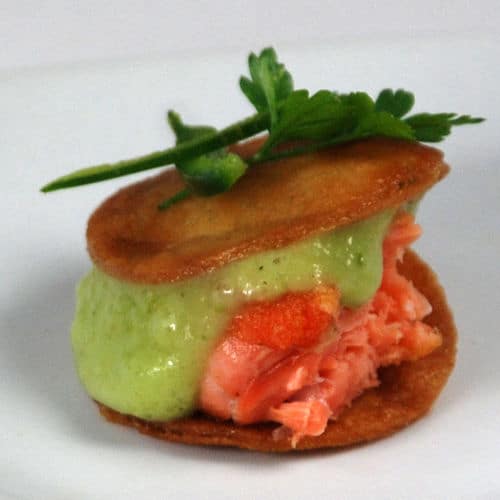 These Mexican inspired salmon bites pack a lot of flavor in a little package. The acidity from the tomatillos compliments the salmon perfectly and the crunch from the fried tortillas adds great texture.
 These instant noodles make for an awesome presentation. They are created in the bowl of soup in front of the diner, or the diner can even make the noodles themselves. They are based off of Wylie Dufresne's instant tofu noodles.
 One interesting use of modernist gelling is to create pliable gel sheets. These gel sheets are made by adding a combination of agar agar and gelatin to a flavored liquid and letting it set. The agar and gelatin add both elasticity for strength and a nice brittleness for flavor release. The ratio of the two ingredient will determine the final characteristic of the gel sheets.
 Marshmallows are a favorite food of children everywhere. These homemade ones are so much better than store bought that there is really no comparison. Whether you want to eat these on smores, in hot cocoa or just plain they will amaze you and your friends.
 Iota carrageenan can be used to thicken liquids and stabilize emulsions or foams. It's also very adept at creating gels. Iota carrageenan works best with dairy products but can be used with a variety of liquids.
 Agar, or agar agar, is a gelling agent extracted from red algae. It is commonly used to stabilize foams and to thicken or gel liquids. It is relatively easy to work with and a good starting point for modernist cooking.
 This creamy iota carrageenan custard is full of poblano flavor and great as an addition to many different dishes. You can serve it alongside pork chops or pork belly, or even as a side with fish.
 My wife's relatives in Florida love their Bloody Marys and this is her modernist take on them, focusing on the celery garnish and turning it into the serving vessel a la the traditional "ants on a log" children's snack.
 One of the fun things about modernist cooking is changing the textures of common dishes while keeping the flavors the same. This creates almost a confusion in the palate when it's being eaten and the brain recognizes the flavors but not the textures. This recipe creates a solid Bloody Mary gel with agar agar that has applications in various dishes.
 These agar gel cubes are a great way to add a unique visual style to a dish, as well as creating little bursts of papaya. You could use a similar agar recipe to gel many different liquids, depending on the dish you are creating.
 Although you can now buy lemon curd in most supermarkets, it is extremely simple to make in your water oven, and the homemade version doesn't contain any preservatives or artificial flavors. Traditional recipes require cooking the lemon-egg mixture in a double boiler until the curd thickens. This can be tricky, as one or two degrees can make the difference between success and disaster. With the sous vide technique, the curd cooks itself without any stress or stirring.
 Gels are a very common technique in modernist cooking. This modernist recipe uses the gelling properties of agar agar to make papaya noodles. These agar agar noodles are a great addition to a several different dishes and are an easy way to add a touch of flair.
 The use of gels in cooking is not a completely modern innovation. As a matter of fact, it dates back in history as far as early as the 1600's in Europe where it was derived from the bones of animals. In Asia, it is part of many traditional dishes which use plant extracts. This classic cooking component and technique has taken on a new life in the form of fluid gels in modern cuisine.
 One of the easiest molecular gastronomy recipes to try is by creating "pearls". Most pearls are solid jelly balls that can be used to garnish dishes or as an amuse-bouche. Here we use sweet-sour balsamic vinegar to make pearls that are a great way to add a hit of flavor to many different dishes. The process of making them is even pretty easy.


